General
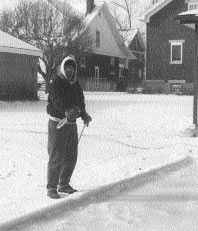 |
| Spraying takes patience. |
When I told my friends that I was planning a backyard ice rink, I received a wide range of responses. A few had memories of winter rinks in their own yards as children; some wondered how I planned to refrigerate it; most just gave me disbelieving looks. An outdoor rink in Cincinnati, OH, is not totally unheard of, but it does make you the topic of conversation.
I had been considering a backyard rink for years when �Building the Perfect Backyard Ice Rink� appeared in Hockey Player Magazine last fall. It spurred me to immediate action. Using a length of string and a torpedo level, I determined that the area behind my garage was within five inches of level. I hoped that would be close enough. I then went about obtaining materials for the rink.
We had some scrap 4x4�s at work that were about seven feet long, and I salvaged 10 that were straight enough to do the job. I purchased six more 10-foot 4x4�s from the lumber yard so I had border material for a 30 by 35-foot rink. My cousin promised me a piece of leftover plastic at least 35 feet wide and about 80 feet long from her greenhouse business. Now, it was mid-November and I was ready to begin assembling my rink.
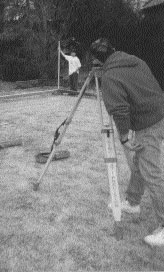
My son Andrew and I spent a day and a half drilling holes and connecting the border with steel brackets. Using the torpedo level, we were shimming and leveling as we went around. Our methods seemed a bit imprecise, so I had a friend come to the house with a transit to ensure that the rink would hold water. We found I was correct in finding five inches of slope along the one side, but there was 12 inches of slope from corner to corner! At that, I nearly abandoned the entire project.
 |
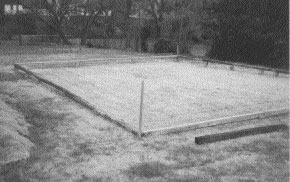
| Build it up another six inches. |
Exploring the Options
I considered building a much smaller rink, keeping the slope to a minimum. After seeing the border laid out encompassing 1,000 square feet, nothing smaller seemed worthwhile. I began exploring my options for leveling the area.
I didn�t want a mud hole for a yard in the spring. To reshape the yard properly, it would be necessary to remove the sod, move the soil underneath and replace the sod. The estimate I got from a landscaper for this was over $800, and he couldn�t do the work before spring. For the rink to become a reality, I would have to take matters into my own hands.
The weekend after Thanksgiving was sunny and mild. I persuaded my dad and three friends � Dick, Pat and Dave � to help me with the landscaping. In two days using a rented sod cutter and all the shovels and rakes we could scrounge, we had leveled the yard to within a couple inches and replaced the sod. It was time again to lay out the border and line the rink.
Constructing the border went smoothly, but when I began unrolling the donated liner I found that it was only 28 inches wide instead of 35 inches. Since it was 80 inches long, I was able to cut it and tape a seam to make a liner large enough to cover my 30 x 35-foot area. By early December, I was ready to build ice. I had purchased my hose, nozzle and other supplies ahead of time � all I needed was some cooperation from the weather.
I was anxious to see it work, so every time the temperature dipped I would be out watering the rink. In Cincinnati, it�s impossible to predict when cold weather will arrive or how long it will stay. I made an inch or so of ice several times only to see it warm up and melt completely.
Cold Weather Finally
In mid-January, we finally got some extended cold weather. Single-digit lows overnight enabled me to make real progress. The first layer in the morning would freeze almost immediately. After three or four thin layers were applied, the freeze time would begin to lengthen until it was necessary to let it tighten up for several hours before layering again. For one pound of 32 degree water to turn into one pound of ice, it must give up 144 BTU�s of heat energy. All this energy warms the existing ice, and the time to freeze a new layer gets longer and longer. In this race with time, I was coming home from work at noon to get a couple hard layers down. At night, I was up until 3 a.m. to take advantage of the cold.
 |
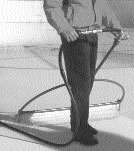
| Almost ready. |
One night, about two inches of damp snow fell. Figuring that any frozen material must be good for the rink, I left it in place and sprayed water on top of it. But the water only dampened the top layer of the snow and froze it into a crust, leaving a crunchy, airy layer beneath. I feared it was ruined. I called Bill Burley at Burley�s Ice Specialties (see sidebar) who advised me to walk out on the rink, break up this layer and soak it through with a direct spray. Doing this tightened up the ice but left it looking like a lunar surface. There were large chunks of ice sticking up everywhere and it seemed that it would take forever to get it all smooth again.
A few times I sprayed too much water and made �shell ice�: a layer of ice with an air layer beneath. This is not conducive to skating. I forced myself to take it slow. Eventually, I had mostly smooth ice with some peaks protruding which I removed with a hammer. After spraying on just a few more layers, the rink was officially opened.
Dream Come True
Having my own personal ice sheet was a dream come true. It was well-used while it lasted. My 14-year-old son, not known as an early riser, was getting up an hour before school to get in a morning skate. In the afternoons, he would be out with friends for some pick-up hockey. At night, the adults would skate in circles while sipping hot drinks. Once at midnight, I found my daughter, Lauren, skating with her friend after they ended their shift at the local ice cream parlor.
I had about as much fun grooming my personal ice sheet as I did skating on it. I received a Rink Maid personal rink resurfacer for Christmas and while it was more cumbersome to use than just a nozzle, it put such a nice finish on the ice that it was worth the extra effort. (Eds note: We can�t seem to locate Rink Maid this year, but NiceIce is offering a hand�held model.)
But winter was short in Cincinnati last year. A week in the mid 40s melted the ice beyond repair. I kept an eye on the forecast and even tried to make ice a few more times, but we never got to skate on it again. When I disassembled the rink in March, I found that the grass underneath was recovering nicely. In no time at all, the sod was firmly rooted.
This fall, I staked out some level lines around the rink area using the bucket and hose method as shown in the diagram. I�ve been dumping gags of topsoil in the low spots to make the entire rink as level as possible. This should greatly improve my response time when it gets cold. This far south your rink needs to be as level as possible. There may not be time to freeze a four-inch pool at one end before you begin covering the rest of the rink. Since the majority of the landscaping was done last year, setup this year will be a snap.
I never felt cold while working on the rink. Standing in snow on a frigid, windy night with water soaking my gloves and running down my arms to the elbow, seeing each layer form into hard, clear ice warmed me all over. People ask me if the little amount of skating was worth all the effort. You bet it was!
Jim Arata played his first season of adult rec league hockey last year � very poorly he says.
SIDEBAR
KITS AND ACCESSORIES FOR THE PROJECT
Depending on where you live, �flooding the backyard� can be as simple as that statement or a more-complicated adventure like author Jim Arata experienced. There are several rink kit suppliers who offer everything from a few square feet of ice for your toddler to full-size community park systems. The main advantage in using a liner or kit is retaining water in less than optimal weather conditions.
There are also hand-held resurfacers and other supplies to both help with your ice-building chores and increase your hockey enjoyment. Keep in mind that once the word gets out that you�ve got a rink in the backyard, your home will become a very popular hangout for the neighborhood kids.
If you�re not interested in any of the following kits but would like more details to satisfy �The Toolman� in you, check out �Hockey: Learn to Play the Modern Way,� from the Sports Illustrated series. The 219-page book ($12.95) includes a chapter with detailed information on building a back yard ice rink. Call 1-800-929-2159 to order.
Dinky Rink
1-888-GO-SKATE
P.O. Box 1349
Concord, MA 01742-1349
Dinky Rink�s product line features the original Dinky Rink and Freeze Frame. The Dinky Rink kit includes everything you need to build a 200 square foot skating rink: durable PVC frame, a tough polyethylene liner, support stakes and liner anchors. The Freeze Frame is designed for larger rinks and requires basic household tools. It includes custom hardware, an extra large liner, and an informative instructional video � everything except the lumber for building a true �miceterpiece.� The 24 x 40 foot kit is priced at $199 and larger sizes are available.
Home Ice Advantage
Burley�s Ice Specialties
1-800-752-8332
115 School Street
Salix, PA 15952
These home kits, which include lining and round Styrofoam perimeter rods, range in size from 12 x 12 feet ($76.95) to 24 x 48 feet ($384.95). The kits also include thermal rink covers that help maintain the ice when not in use. If you are really crazy and rich, you might want to consider Burley�s community rink kit: We�re talking 80 x 96 feet for $2,956. Toll-free, 24-hour telephone support is also available along with a supply of scrapers, squeegees and snow pushers.
Ice N� Go
Network USA
1-800-477-6434
7500 Roswell Rd., Suite 118
Atlanta, GA 30350
Ice N� Go kits are offered in 16 sizes ranging from 13 x 17 feet ($129.99) to 25 x 53 feet ($279.99). One feature of this system is its patented rigid PVC border which protects the liner from skate and shovel cuts, and also makes adjusting for unlevel surfaces easier. As an added touch there are even red and blue lines included.
NiceRink
1-888-NiceRink
P.O. Box 310
Richmond, IL 60071
www.nicerink.com
 |
| You always wanted to drive the "Zamboni." |
NiceRink sells rink liner by the foot cut to order (length and width). NiceRink I is a triple-laminated, pre-stressed, high-density polyethylene sheet at 11.5� a square foot while the NiceRink III is even more puncture and tear resistant at 18.5� per square foot. NiceRink also makes the NiceIce portable ice resurfacer, which makes hard ice in less time with less water and less hassle (36 inches wide $159.95). And for that stretch between the back porch and your rink there�s NiceMat, cobblegrain vinyl matting sold by the linear foot (starting at $4.40 PLF). There are a total of 16 accessories ranging from patch tape to a special SoftPuck specially designed for shinny hockey.
This first appeared in the 11/1997 issue of Hockey
Player Magazine®
© Copyright 1991-2003, Hockey Player® LLC and Hockey
Player Magazine®
Posted: Nov 12, 2001, 07:49
Top of Page
|
